PostgreSQL是一个功能强大、使用广泛、开源、多平台和先进的对象关系数据库系统,以其经过验证的架构、可靠性、数据完整性、强大的功能集和可扩展性而闻名。
此外,pgAdmin是一个先进的、开源的、功能齐全的、基于Web的管理工具,用于PostgreSQL数据库服务器。在本文中,小编简单介绍下在RHEL 9系统中安装PostgreSQL 15和pgAdmin数据库主要过程,一起来看看吧。
第1步:在RHEL 9上安装PostgreSQL
1、首先通过运行以下dnf命令禁用内置PostgreSQL模块,命令如下:
# dnf -qy module disable postgresql
2、接下来启用官方PostgreSQL Yum存储库,命令如下:
# dnf install -y https://download.postgresql.org/pub/repos/yum/reporpms/EL-9-x86_64/pgdg-redhat-repo-latest.noarch.rpm
3、之后安装PostgreSQL 15服务器和客户端软件包,命令如下:
# dnf install -y postgresql15-server
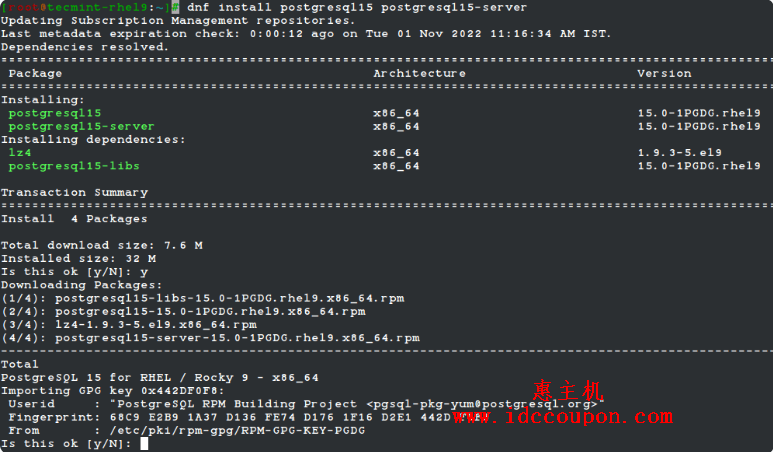
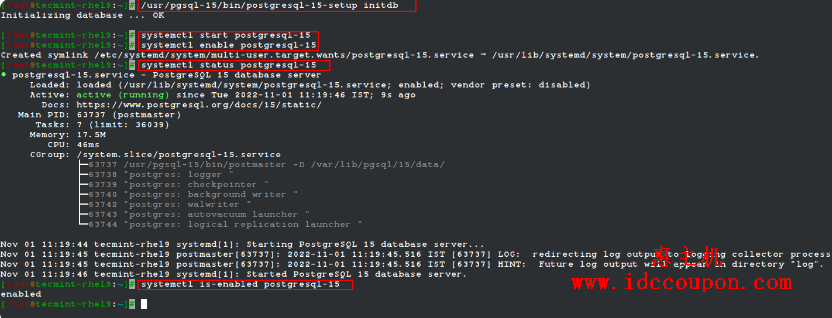
4、安装完成后,初始化PostgreSQL数据库,然后启动PostgreSQL-15服务并使其在系统启动时自动启动。然后检查该服务是否已启动并运行,并且已启用,具体如下图所示:
# /usr/pgsql-15/bin/postgresql-15-setup initdb
# systemctl start postgresql-15
# systemctl enable postgresql-15
# systemctl status postgresql-15
# systemctl is-enabled postgresql-15
第2步:保护和配置PostgreSQL数据库
1、接下来保护Postgres用户帐户和数据库管理用户帐户。首先使用passwd实用程序为Postgres系统用户帐户创建密码,如下所示:
# passwd postgres

2、然后切换到Postgres系统帐户状态,并为PostgreSQL管理数据库用户/角色创建一个安全且较强的密码,命令如下:
# su - postgres
$ psql -c "ALTER USER postgres WITH PASSWORD 'securep@sshere';"
$ exit

3、现在配置Postgres服务器如何验证pgAdmin等客户端。支持使用基于密码的身份验证,其方法包括:md5、crypt或password。
在本文中,小编将在文件/var/lib/pgsql/15/data/pg_hba.conf中配置md5身份验证方法。
# vi /var/lib/pgsql/15/data/pg_hba.conf
找到以下行并将身份验证方法更改为md5,如屏幕截图中突出显示的那样。
host    all             all             127.0.0.1/32            md5
host    all             all             ::1/128                 md5
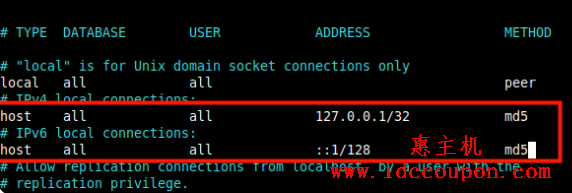
4、保存文件后,要应用Postgres配置中的最新更改,请重新启动Postgres服务,命令如下:
# systemctl restart postgresql-15
第3步:在RHEL 9中安装pgAdmin4
1、现在将安装pgAdmin 4来从Web管理PostgreSQL数据库,但首先需要启用包含一些依赖项的EPEL和pgAdmin yum存储库。
# subscription-manager repos --enable codeready-builder-for-rhel-9-$(arch)-rpms
# dnf install https://dl.fedoraproject.org/pub/epel/epel-release-latest-9.noarch.rpm
# dnf install -y https://ftp.postgresql.org/pub/pgadmin/pgadmin4/yum/pgadmin4-redhat-repo-2-1.noarch.rpm
2、现在为新安装的pgAdmin和EPEL存储库构建缓存,并使用以下命令安装pgAdmin 。
# dnf makecache
# yum install pgadmin4
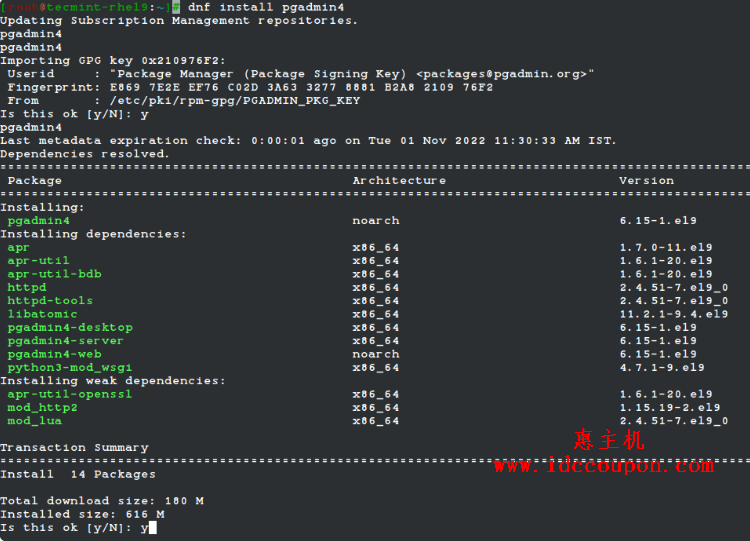
3、接下来,启动httpd服务并使其在系统启动时自动启动,然后检查它是否启动并运行,命令如下:
# systemctl start httpd
# systemctl enable httpd
# systemctl status httpd
第4步:在RHEL 9中配置pgAdmin 4
1、pgadmin4软件包带有一个可配置的脚本来配置pgAdmin web 服务,它将创建一个用户帐户,用于在web界面中进行身份验证,配置SELinux策略和 Apache webserver以部署pgAdmin web服务。
# /usr/pgadmin4/bin/setup-web.sh
样本输出如下
Setting up pgAdmin 4 in web mode on a Redhat-based platform...
Creating configuration database...
NOTE: Configuring authentication for SERVER mode.

Enter the email address and password to use for the initial pgAdmin user account:

Email address: admin@idccoupon.com
Password:
Retype password:
pgAdmin 4 - Application Initialisation
======================================

Creating storage and log directories...
Configuring SELinux...
The Apache web server is running and must be restarted for the pgAdmin 4 installation to complete. Continue (y/n)? y
Apache successfully restarted. You can now start using pgAdmin 4 in web mode at http://127.0.0.1/pgadmin4
2、如果启用并运行了firewalld服务,请在防火墙中打开端口80和443以允许到HTTPD Web服务器的流量,具体命令如下:
# firewall-cmd --permanent --zone public --add-port 80/tcp
# firewall-cmd --permanent --zone public --add-port 443/tcp
# firewall-cmd --reload
第5步:访问pgAdmin Web界面
1、要访问pgAdmin Web界面,请打开浏览器并输入以下URL地址:
http://SERVER_IP/pgadmin4  #换成你自己的服务器IP地址)
或者
http://localhost/pgadmin4
登录界面加载后,使用在上面第4步第一个步骤中创建的电子邮件地址和密码进行登录:

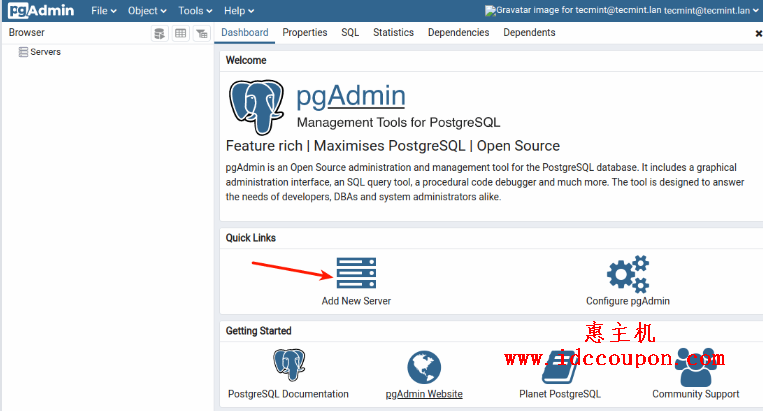
2、接下来,通过单击“Add New Server”添加新的服务器连接。
3、然后在“General”选项卡下,输入以下设置服务器名称并填写相应的描述文字。
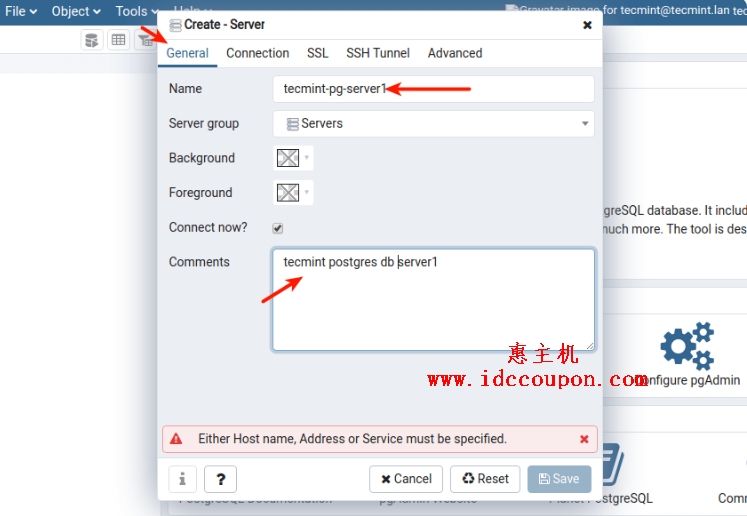
4、然后通过填写以下内容定义连接配置文件:
- Host – PostgreSQL 服务器的主机/IP 地址。
- Port– 默认端口为5432。
- Maintenance Database——默认应该是Postgres。
- Username——数据库用户名。可以使用Postgres。
- Password– 上述用户的密码。
然后单击Save保存按钮:

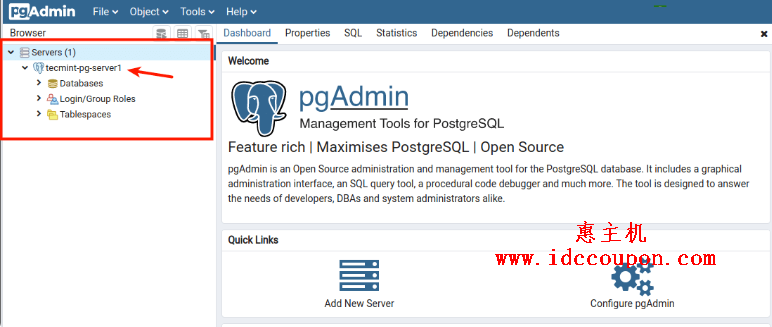
5、新服务器现在应该出现在服务器列表下方,如下图所示:
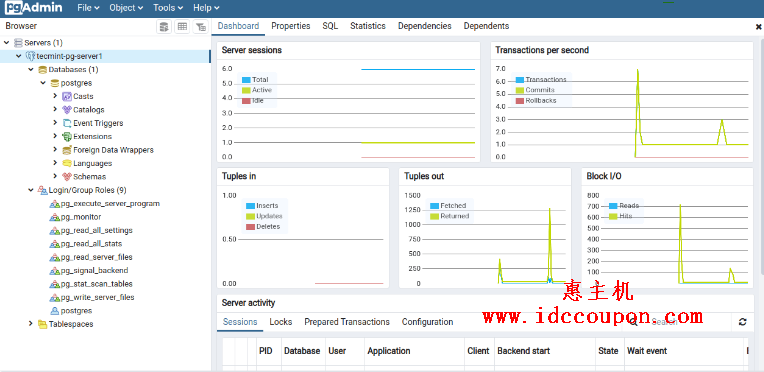
6、单击服务器名称时,其属性应加载到仪表板下,如下面的屏幕截图所示:
总结
在上述主要步骤当中,小编已经成功的在RHEL 9系统中安装了Postgresql 15和pgAdmin 4数据库,相对来说不是很难,如果有不清楚的小伙伴可以参考上述教程进行设置。
众所周知,PostgreSQL一直以来是一个功能强大的开源对象关系数据库系统,它使用并扩展了SQL语言,同时结合了许多可安全存储和扩展最复杂数据工作负载的特性,因此在业内拥有极高的声誉,在国内外获得很大的关注度,在全球使用率极高。
推荐阅读:
Rocky Linux(AlmaLinux )系统安装PgAdmin4软件详细教程
CentOS 8系统安装PostgreSQL和pgAdmin详细过程
 惠主机
惠主机


